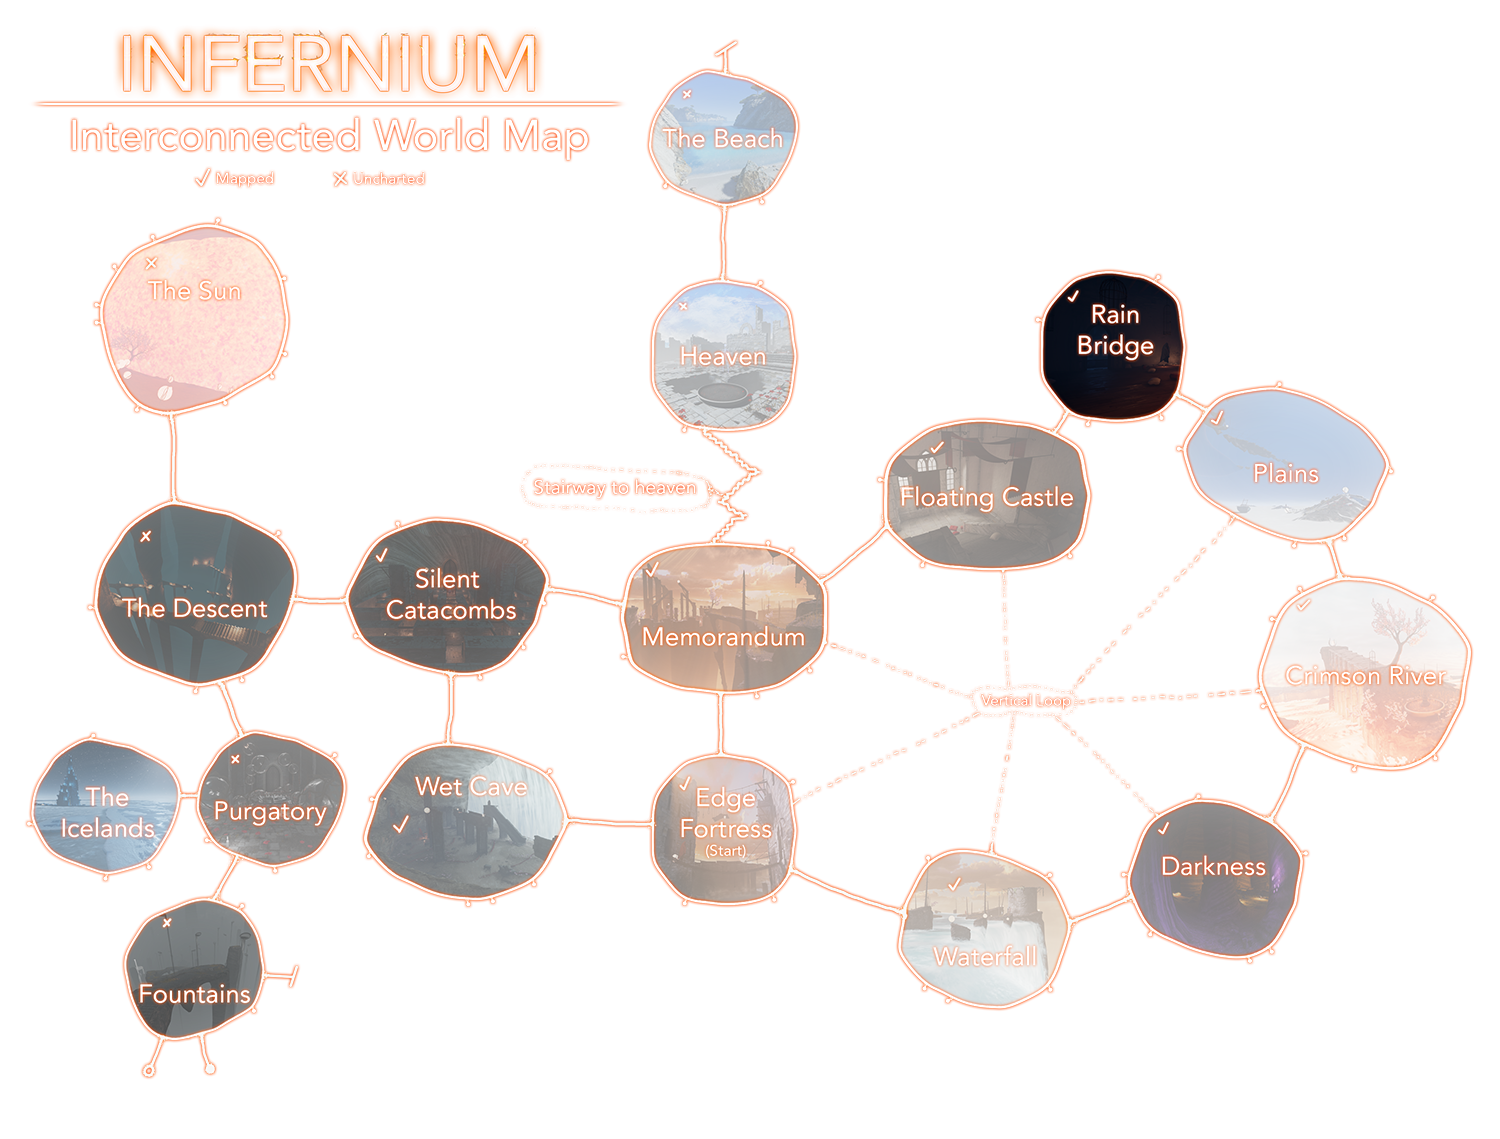
Note: If you are looking for specific areas tricks, secrets and advice, please visit the Maps section of the Infernium wiki.
General Progression[]
Your main goal in Infernium is to get 4 more harvesting fingers (with the harvesting finger you start you will have a total of five) to reach the top of the stair in Memorandum to get to the ending challenge that preceeds The Beach. In this process you will have to avoid permadeath or you will have to complete aditional challenges to be able to earn more oportunities.
In general, the process of getting the 4 harvesting fingers can be divided in two separate quests: getting your second and third harvesting finger (early game), getting your 4th and 5th finger (mid game) and completing the ending challenge (end game).
Early Game[]
Maps: Edge Fortress, Memorandum, Silent Catacombs, Wet Cave, Floating Castle, Rain Bridge, Plains
Your focus in the early game is to get the second and third harvesting fingers. After you complete the "tutorial" level Edge Fortress you will reach the Memorandum. Remember this area because getting to the top of that big staircase you see in the distance is going to be your main Focus during early game and mid game. After progressing through the Memorandum the game divides in two possible paths: You can either go to the Silent Catacombs to get the Flash Light and a Harvesting Finger or go towards the Floating Castle and get the Triangle Tattoo (usefull to open shortcuts and various areas through the game), a Harvesting Finger and the longer Dash. It really doesn't matter if you go first up (floating Castle) or down (Catacombs), but take in mind that if you complete one of these areas first, the skills you learn in the first area you visit will help you a lot in the second area you visit. Remember also that you can get the Circle Tattoo in the Memorandum whenever you already have 2 harvesting rings. This object is optional.
Tutorial[]
You will spawn in the Fire Cairn in Edge Fortess. Do not attempt to reach the farthest cliff (you will need the long dash to make that jump). There is a hidden path beneath the bridge that will provide you with a door you cannot unlock yet (it will unlock a shortcut to the Wet Cave ) and and some extra Light to harvest. Remember, if your harvesting ring is already full, DO NOT harvest more light. You will throw it away.
Get used with the controls and progress through the bridge doing the dash. Open the door, catch the elevator and approach the first Crimson Cloak of the adventure. He will start chasing you once you are close enough. Walk towards the hole in the wall in the interior and use the scenario to guide him behind you and cross the bridge. He will still be chasing you. When you approach the second building you will see a button in the left. If you use this button the door in front of you will close. If you are fast you can still enter after pressing the button. If you want to play it safe, DO NOT press that button. Instead, cross the door and you will find another button to your right. Use that one instead. If you explore this building before going to the next bridge you will open a shortcut going to the previous building that you can use if you die so you do not have to confront the Crimson Cloak again.
In the Next building, you will see an invisible door in chains (Cerberus, maybe...?). Do not approach him by any means. Instead go to your left. You will see a staircase going up and a staircase going down. Go up. Do not approach the Blue Cloak. You will see a button between lines of chains. Use it and go back where Cerberus was. Now he is gone and the main door is opened. If you don't want to free it or do not want to go that way again you can just point your dash skil to the first one on the left flag and you will be in next room but don't forget while descending to floor use the rocks when you keep going the game will give you the achievement about the dog. Outisde you will find Crimson Ash. Don't worry, it is harmless to you and you can go through it safe. Your enemies won't be able to chase you through it. Remember that, it will be usefull.
After going through a Cave with the first Black Fire you will find in Infernium you will reach the Memorandum. Go further and activate the Fire Cairn of the Memorandum. If you die, you will reespawn here once you leave the Purgatory
Memorandum[]
The Memorandum can be a little bit tricky to navigate but do not easitate. It is easier to navigate than it seems. From the Fire Cairn Dash yourself to the little room in front of you. Harvest the light and open your first Light Barrier. You are now in a free to explore area with the first Light Pit and the famous end game stairway in front of you.Feel free to roam in the upper area. Once you find a way down, be aware of the Crimson Cloaks. If you can find it down there is also the Circle Tattoo item (optional) and the 2 harvesting fingers Light Barrier you will have to open in the future.
There is plenty of stuff to do in this area. When you get yourself to a hallway with a orange door in front of you, an orange door at your left and a light barrier at your right, open the door on the left. Do not esitate. You are probably being chased onces you get here and the timing is really thin. After you open that door, you will have to make a choice:
- Go Left (blue lighting) and dash yourself in the hole in the wall to enter the Silent Catacombs
- Continue straight and dash into the cliff outside to go to the Floating Castle
Path A:
Silent Catacombs[]
Dash yourself down the hole until you reach a bridge. Continue the path and throw yourself into the hole of the hallway. You will reach a dark cave. It is easy to navigate using the dash. Aim for the Exit in front of you at your left and throw yourself into the hole to enter the prison.
Go down the stairs and explore the area. Once you find the Fire Cairn, DO NOT go to your right. There is a Crimson Cloak waiting for you at your right. Instead, look into the ceiling and you will see a diagonal wall with blue light you can teleport to. Dash there, then dash to the other side and then go down without alerting the Crimson Cloak. Open the light barrier with a full harvesting finger (if you don't have enough Light don't worry, search nearby) and activate the Fire Cairn.
To solve the prison puzzle, go up the stairs again and throw yourself in the correct hole to open the gates or the middle cell. Then use the button near the Fire Cairn and run towars the orange door. Use the dash to go to the other side. Continue straight and find a hole in a wall that will get you to a river. Follow the river. Open the shortcut to the prison in the ceiling, then continue and turn to the left. Solve the puzzle (think your path from the upper floor and then jump down, activate the Crimson Cloak and use the button).
The next area looks like a really big maze. Dash somewhere in the upper floor to avoid the Blue Cloak waiting your at your left. You can inspect the area more efficiently dashing into the big columns on the left from the left wall of the maze. The strategy is really simple: Activate the button in the center of the maze to open the big doors, then rush to it avoiding with clever moves the various enemies in the maze. When you reach the big doors, dash behind the Blue Cloak guarding it and do not stop until you surpass the Red Ash.
Traverse the Broken Bridge using the Red Ash at your own interest and continue to the next area, the Wet Cave.
Wet Cave[]
Note: If you already got the Triangle Tattoo, instead of following this guide for this area go to the cliff where you started the adventure and open the Light Door there using the Triangle Tattoo. You can explore the wet cave from here too.
Don't worry too much about the Blue Light Barriers, just throw yourself into the water and grab the Flash Light. You can approach the Blue Light Barriers and destroy them using the flash light. Destroy the one to your left and proceed into this dark area. Throw yourself into the hole and continue exploring until you reach a room with various exists. You want to catch the elevator and go up. Unlock the Light Barrier using 1 full harvesting finger and activate the Fire Cairn. Congratulations! Back where you started! Use this Fire Cairn to explore the wet cave. In the wet cave, use the red ash to solve the puzzles. Eventually you will get into an area from the inside of a waterfall, where you will have to face the first challenge to get the harvesting finger. Please go to Waterfall Arena for the strategy about how to complete this area.
Path B:
Floating Castle[]
From the Memorandum, dash through the cliffs until you reach a big long cliff with the entrance of the floating castle on it. Go to the staircase and start going up. When you reach the button think before you enter the castle: you won't be able to go to again The Memorandum again unless you get the triangle tattoo in the Rain Bridge level or you die before activating the Fire Cairn inside the Castle or the Rain Bridge.
When you face the first big stairs with two hallways on each side, please go to the left and go through that door. You will become trapped in a big room and you will have to solve your first Ritual of the game. The mechanic is really simple: Search for roman numbers in the environment and then use the smal black sand pots to change the fire numbers in the big black sand pots. Once both numbers are set, activate the small sand pot holded by a spiral. If the numbers are correct the big Light Barrier in the door will be deactivated forever. Remember this mechanic because you will have to use in in the game during other challenges.
Go up the stairs. You will reach a big room. You can continue towards the big stairs and face your second ritual (this time with a Crimson Cloak chasing you) but we really advice you to explore the hallways in this floor first. Don't worry, there are no enemies here. Instead, you will find a Fire Cairn, a Light Pit and some shortcuts to be opened. Also, if you have completed Path A first, here you will find a Blue Light Barrier that can easily be opened with the Flashlight. It will open a shortcut straight to the Rainny Castle Arena.
With the Castle Fire Cairn activated you won't have to worry about the big walk from the Memorandum to the Castle and you will explore the Castle more confortable.
To go on, catch the elevator near the Fire Cairn or solve the second ritual we talked about earlier. Eventually you will reach and area with big, big hallways, some dark dead ends in the hallways and a door guarded by a Blue Cloak. Search the hallways until you find the button that unlocks the door. In reality, those big hallways connect making a big horizontal loop. Activate the Blue Cloak and use this loop to put some distance between you and him. Eventually you will reach an elevator. Activate it, but be quick or the Blue Cloak will catch you!
In this new floor of the Castle you can open some shortcuts but eventually you will have to solve your third Ritual challenge. In this challenge the big black sand pots are separated from the smaller ones that change the numbers of then so you will have to remember what numbers are in the black sand beforehand! The strategy is quite simple: Put some distance between you and the Crimson Cloak and slowly complete the ritual. When that's done, proceed towards the next elevator.
If you are in the correct area, everything should be tinted with a blue light and you should hear the rain in the outside. Before going to the Arena waiting to you at the end of the big hallway with the stairs, activate the other elevator, go down, activate the other elevator next to the first one and open the shortcut to the Fire Cairn in the Floating Castle. Once this is done, proceed to open the door of the big Hallway and be ready: you reached the Rainny Castle Arena. Complete it and catch the elevator that will bring you to the next area: The Rain Bridge.
Rain Bridge[]
When you first entener the Rain Bridge you will see a lot of Light Barriers that can only be opened with the Triangle Tattoo. Go inside the big room with the Fire Cairn on it and proceed to go to the balcony but be REALLY CAREFUL not to activate the Blue Cloaks and the Grey Cloak on the room. In the balcony you will find the Triangle Tattoo. The first thing you should do is activate the Fire Cairn in the room. Then use the tattoo to open the rest of the light barriers. Remember you can now go back to the Memorandum using the Triangle Tattoo.
Eventually you will get yourself trapped in a room with a bridge connecting it to another tower of the castle. Be extra ready when crossing the bridge because there is an enemy waiting for you in the middle of it. You can't see it? Take a closer look. You can only see him through the rain. Welcome Rain foes.
Activate him and go back inside to get rid of him using the column at the right of the room. Remember, you can only see him through the rain. This means when you go inside you won't be able to see him anymore. Traverse the bridge and close the door behind you so the rain foe can't chase you no more.
Open the next door and cross the bridge. Once you get to the other side you will activate a rain foe waiting to you just inside of the building. Go back to the interior room and using clever moves get rid of him. Traverse the bridge and cross the red ash. You are now safe again. In this area you have 2 choises. You can go through the windows and go back to open a shortcut to the Fire Cairn or you can open the big door on the room to proceed to a big hallway. At your right, the Green Hallways Arena. If you don't have the long dash yet you won't be able to acces this area yet. At your right, a big lond staircase getting smaller and smaller that will bring you to the next level: the Plains.
Plains[]
On the top of the staircase you will exit to a big, blue sky white sand plains with some little brown hills on them. If you look up you will find the sky itself eating some suspended rocks. We will worry about it later. For now do not go out of your brown hill. The plains are crowded with rain foes you can't see because it is not rainning... yet. Instead, search the borders of the brown hill until you find some footsteps in the sand. Follow the footsteps. You will reach a blue button. Activate it. Here goes the rain. With the rain activated go to the Fire Cairn on the Plains trying to not activate the rainfoes and activate the Cairn. Now you are ready to face the Plains Arena
Once you completed the arena and you earn the big dash in the suspended rocks, catch the elevator and go down to the plains again. With the long dash skill you can go back to the Rain Bridge and make the jump that will guide you to the Green Hallways Arena. Complete it and you will earn a Harvesting Finger!
Mid Game[]
Maps: Plains, Crimson River, Darkness, Waterfalls
If you already have three harvesting fingers you are ready for the mid game. The mid game of Infernium can be approached in two ways. You can open the three harvesting fingers light barrier on the top of the Plains or you can dash with the long dash from the start of the game to the cliff at your right to make your way through the waterfall area. Either way you choose will led you thowards the fourth and five harvesting fingers. One in the Crimson River level and anotherone in the underground lake arena. You can approach your way though either way because all these levels are part of the vertical loop .
It is also a good idea in this part of your journey to go back to the Memorandum to unlock the second and third light barrier of the main staircase and explore more zones in this area that you couldn't go before but that are now opened to you thanks to the long dash. You will find important bits of the Lore in this area and also a good amount of light to harvest to refill some extra oportunities.
Approach from The Waterfall[]
If you decide to continue through the waterfall, go back to the start of the game and use the lond dash into the cliffs are your right. In the second cliffs you will find a Patroler enemy. They just patrol an area and will never ever be alarmed. They won't chase you. Progress through the cliffs until you reach an area full of spike looking trees scattered in some islands over the waterfalls with two circular towers. One shorted in the center and one taller at the edge of the waterfall. For now, dash your way until you reach an island near the shorter tower in the middle. If you are in the correct one you will be able to dash into the top of the tower. Go down into the spiral stairs and you will find the Waterfall's Fire Cairn .
After that, go back into the outside area and dash your way into the tallest tower. Go in and then go up. There you will find The Compass. After getting the compass go down and find a room with a weird looking button on it. Once you activate it, you will link your compass with the correct "frame" to dash through. If you use your left hand after interacting with the weird looking button the compass instead of turning around in circles will point towards a certain direction. Follow it and dash into the frame. After that, you will find a challenge similar with the previous one but with a Crimson Cloak chasing you. Once solved, continue through the cave. It is really easy to get rid of the Light Foes using your flashlight. Open the door and you will reach the Fire Cairn again. Time to to again to the top of the short tower and activate the werid looking button there. Follow your compass towards the correct frame and dash yourself through it. Eventually you will reach again another flooded area. Open the orange door there to open a shortcut to the Fire Cairn. Go back and follow the highway and before you activate the big circular elevator open the door so you can access it from the other side if needed. Congratulations, you have reached the upper part of The Darkness level
Approach from The Plains[]
If you choose to continue your path from the plains area, go again into the suspended rocks on the sky and reach the end of the path. You will literally get inside the sky. Follow the path there until you reach a three harvesting fingers light barrier. Open it and catch the longest elevator in Infernium. Get up the stairs and go outside. Congratulations, you reached the Crimson River .
Darkness[]
Coming from the Waterfall[]
Activate the circular elevator but don't rush into it. Instead, wait for it to go down and look into the hole. Dash into the floor in the hole and dash again into another hole in the wall leading you into a cave. This is one of the most dificult areas in the game. You will need to use your Flashlight to burn down the Light Foes roaming in the cave. You can open a shortcut when you complete the first half of the cave. In the second half of the cave you will need to also kill the light foes but this time with a Crimson Cloak Chasing you. Eventually you will find a hole in the ground in the cave. Fall through it and you will reach the Fire Cairn in the Darkness. Open the door to open a shortcut to the circular elevator. Once that is done, you have 2 choises: you can go straight into the Underground Lake Arena to try to get the harvesting finger there or you can open the three harvesting fingers light barrier to catch another elevator down leading you to a challenge you will have to solve in order to reach the Crimson River. If you choose this path, enemies will start chasing you immediatly once you do down with the elevator. This area is two puzzles in one: there is a ritual puzzle and a door with a timer puzzle. If you want to go to the Crimson River don't even bother to solve the ritual. Focus on the door puzzle. Once completed, proceed until you find a light pit and the staircaise going down leadin to the Crimson River.
Coming from the Crimson River[]
Go up the staircase until you reach the Light Pit. Unlock the door at your right and go into the open area to solve the ritua challenge there. Once completed you will be able to reach the button that activated the elevator. Use the elevator, deactivate the light barrier and activate the Fire Carin in the flooded area. If you open the big orange door you will get to the circular elevator. If your continue towards the path at your left you will get into the Underground Lake Arena where you will find a harvesting ring.
Crimson River[]
Right at the center you will find the Fire Cairn of the Crimson River, under a cherry blossom tree. It doesn't matter wether if you accesed theCrimson River level from the plains o the darkness. Either way you can dash up or down until you reach the Cairn. In your path you will findExploders . Once you come come to them they will chase you and you will have a few seconds to GTFO before they explode and kill you. Use your dash to get away quickly. Once you reach the Fire Cairn you can start focusing on exploring the area. The Harvesting Finger is right in front of you, but you can't get it because there are three light barriers between you and it. Scaterred in the plataforms above the lava there are the switches that deactivate those barriers. Tip: they are near the other cherry trees. Explore the ruins, dash between the platforms and eventually you will start unlocking the barriers. The hardest switch to get to is the one in the lower part of the lava river. You will have to go through some laberintic ruins full of Exploders. Watch out and always be aware of your surroundings. There other two switchess will involve a chase between a Crimson Cloak and you to get to it in some ruins and the same event but in a big open area. If you liberated the invisible Cerberus, he will chase some of the exploders there and he will die, taking away 5 exploders with him.
End Game[]
Maps: Heaven, The Beach, Fountains
That's it! You have made it! You already have the five harvesting fingers! Time to go to the Memorandum again and open the rest of the light barriers in the stairway. One common strategy some players follow is to not harvest any Light in the Memorandum to just harvest it when needed to open the stairway light barriers. We also strongly recommend to go to a Light Pit and try to earn back some more oportunities. The heaven challenge is quite intense and you can expect to die a lot.
Heaven[]
After you reach the top of the stairway, you will find out the stairway keeps going up, but this time in form of orange steps. Continue up until you the fog clears up. At your left you will find the Fire Cairn. At your right you will find the activator pot of the Ritual. In front of you, two challenges in one.
If you want information about how to succeed in the two-stage arena, please visit the Heaven Arena wiki page.
After you have completed the challenge you will find yourself on the lower part of a really big big staircase full of White Cloaks at each side and two Dark Cloaks next to a big door. Don't worry about the White Cloaks and keep going up the stairs. Eventually the door will open showing you a white light behind in. Before you reach the light you will find two Dark Cloaks guarding the door. We won't spoil what they will do to you, but you need to find your way into the white light.
Once inside everything will turn white and after a few seconds you will reach The Beach.
The Beach[]
There is nothing you can do here except for taking a walk. There is a cave at your right, it's possible to open it if you interact with it having in your hand at least 1 full charged finger. For now it's not clear the relation with the displayed number (XXV = 25) on the sigil. After the barrier is gone, you can reach the White Fountain. After exploring the area for a bit, something will trigger. This is also an excellent area to use the Photomode a little bit. You will have limited time in this area, take that into account.
Black Waterfall and White Waterfall[]
After the events on the beach you will reach the twin fountains. If you get killed in the beach, you will spawn in a cliff with water and grass emulating The Beach. Otherwise, if you came from the cave of The Beach, you will spawn at the top of another cliff (the one visible from the stairs). Depending on the cliff, you can reach one waterfall or the other one: if you spawn in the cliff emulating The Beach, you can only reach the Black Waterfall, otherwise if you didn't get killed in The Beach, you can choose whether to go to the Black Waterfall or the White Waterfall. Each waterfall leads to a different ending.
Note: For a video of the path to reach the White Fountain, please visit the Video section.
Secret Ending[]
At the beginning of a new game, when you are in the darkness and you have to press a button to start the adventure, you can choose not to do so and wait few minutes. After a while, the background sound will become more intense, and something similar to driving cars sounds can be heard. After some more time, credits will be displayed, putting an end to your not yet started adventure.
[]
Gallery[]
